Mixing Bentonite Mud in the Proper Proportions and with the Proper Additives Will Ensure the Best Drilling Fluid for Mud Rotary Drilling.
Mixing Bentonite Mud
On previous pages we discussed how water, soda ash, bentonite and polymer make a "properly engineered drilling fluid".
On this page we will examine the practice of making good drilling mud.
We will also look at the test used to determine its viscosity to be sure the mud is suited for the formation we are drilling.
Note: The content on this page has been adapted from publications of Lifewater International, authored by Fred Proby.
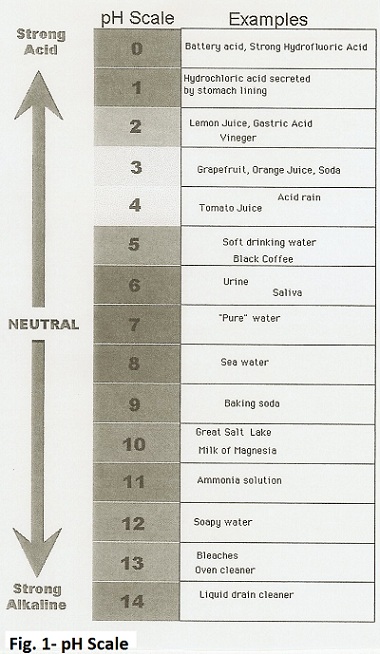
The term ''pH'' refers to how acidic or alkaline a liquid is. A pH of 7.0 is neutral, a pH lower than 7.0 is in the acidic range, and a pH higher than 7.0 is in the alkaline range.
See Figure 1.

As described on a previous page, the pH of the water used when mixing bentonite has a significant effect on whether bentonite can be fully hydrated.
The pH of the water, before adding bentonite, should be in the range of 8.5-9.5; this is slightly alkaline.
There are several ways to measure pH but the easiest is to use a pH test strip. This is a paper strip that changes to different colors depending on the pH.
To use it, just dip the strip in the water, wait a few seconds for the color to develop, and then compare the color of the strip with a color chart supplied by the manufacturer.
Adding soda ash to water that is either too acidic or too alkaline will bring it into the pH range needed for bentonite to hydrate properly. Soda ash will also condition the water if has too many minerals (''hard'' water).
There are just 4 easy steps:
1. Determine how much water needs to be treated.
2. Using the “Additives Measurement” table on the "Bentonite Properties"page, measure the amount of soda ash needed.
3. Dissolve the soda ash in the water.
4. Re-test to make sure the PH is between 8.5 and 9.5 before adding bentonite.
Using the values in the “Additives Measurement” table on the "Bentonite Properties" page, you can determine how much soda ash will be needed to condition the different volumes of water.
For example:
If you are mixing bentonite in one 55-gallon drum: it requires one full “scoop” of soda ash to achieve the proper pH.
Another example…
Two mud pits of one cubic meter each: would require 8 ''scoops'' of soda ash.
Now that we've tested and conditioned our water, we're ready to start mixing bentonite. Some drillers mix it directly in the mud pits, but there are two problems with this:
1. The "mud mixer" attachment that comes with the LS200 or LS300 can't completely mix the bentonite in a single pass.
As a result, bentonite tend to settle to the bottom of the pit when you are mixing bentonite. The suction hose will not pick up all of these clumps, leaving a significant amount of bentonite that is not fully hydrated at the bottom of the pit.
2. Most soil is either porous or cracked, so, until the mud gets thick, water will soak into the ground and be lost through the sides and bottom of the pits.
For these reasons, many drillers recommend first mixing bentonite in a large trash can (114 liter or 30 gallon capacity) or in a 55-gallon (208 liter) drum or barrel.
Very slowly add a half sack of bentonite to the water and circulate it with the mud pump. This results in very thorough mixing with no lumps.
When mixed in a vessel this size, use a full sack of bentonite to get a very thick mud. This mud will then be diluted when it is added to the mud pits.
It takes at least 30 minutes of circulation through the mud pump to mix and fully hydrate a premium grade of bentonite.
A lower grade of bentonite may take longer.
The suction strainer will clog up with clumps of bentonite so it must frequently be cleaned off by hand.
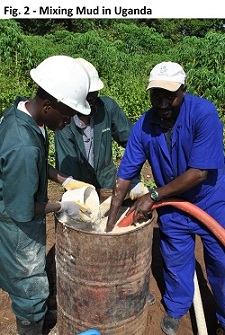
This drilling crew is mixing mud in a large trash can. The mud pump from the drill rig circulates the mud, getting the bentonite fully hydrated.
See Figure 2.

As explained in the previous lesson, it is necessary, when mixing bentonite, to match the viscosity (thickness) of the drilling mud to the formation being drilled.
When drilling through silt or fine sand, the mud need not be as thick as when drilling through gravel.
If the drilling mud is not thick enough, it will not lift cuttings out of the hole.
But if the mud is too thick, then the cuttings can't drop out in the settling pit and they will be recirculated down the borehole.
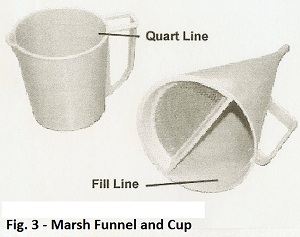
A Marsh Funnel is used to measure mud viscosity.
The two parts are funnel with a screen and a quart measuring cup.
(Marsh Funnels can usually be purchased from the local distributor of drilling supplies).
See Figure 3.

To measure mud viscosity:
1. Hold the Marsh Funnel in an upright position with your finger over the outlet.
2. Using the quart cup, pour drilling fluid through the screen in the top of the funnel until it reaches the fill line marked on the inside of the funnel.
It will take more than one quart. Pour out any drilling mud remaining in the quart cup.
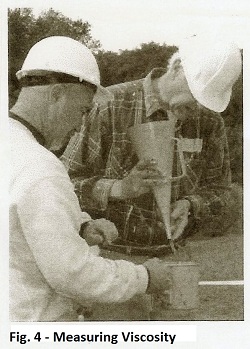
3. Holding the funnel over the quart cup, remove your finger from the funnel outlet and measure the number of seconds that it takes to fill the quart cup up to the mark. (The funnel holds more than a quart, so it will not be empty after a quart flows through.)
See Figure 4.

The resulting seconds per quart (shortened to ''seconds'') represents the viscosity of the drilling mud.
Water has a Marsh funnel viscosity of 26 seconds as shown in the table below. Thin drilling mud is around 35 seconds and very thick mud has a Marsh Funnel viscosity greater than 70 seconds.
The outlet of the Marsh Funnel has a set (calibrated) diameter so if it becomes clogged or damaged in any way, the funnel will not give accurate results.
Therefore, it is important to wash the funnel and the cup in clear water after taking a measurement. Keep the funnel and cup in a protected place and never use them for any purpose other than measuring mud viscosity.

Return to "Introduction to "Bentonite Clay" from "Mixing Bentonite"
Return "Home"


