Outdoor Privy Slab or Platform Construction Can Be of Concrete, Wood, or Bamboo
Outdoor privy slab or platform designs depend upon the intended features of the privy and available materials.
Note: The content on this page has been adapted from tech notes entitled “Water for the World” published by USAID.
Outdoor Privy Platform Construction Steps
Some construction steps may take only a few hours. Others may take a day or more. The length of time it takes depends on local condition, the materials available, and the skills of the workers.
If you familiarize yourself with the construction steps and the materials and skills required to build the desired outdoor privy, you can then estimate the time each step will take and plan accordingly.
Draw up a work plan listing each step of construction and the time estimated for each step. Assemble tools, supplies, and materials and the people who will be doing the work. Anticipate the requirements for each step of construction.
Constructing a Reinforced Concrete Squatting Slab
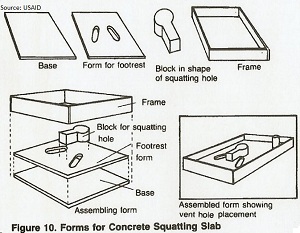
1. Build wooden forms similar to Figure 10. For a ventilated outdoor privy see inset on Figure 10.
Note that the squatting hole and the hole for the vent pipe are produced from solid wood blocks and the raised footrests from holes cut in the form.
The slab is made upside down. If the slab is to have a pour-flush bowl, the shape of the hole must conform to the shape of the bowl unit.
Measurements should be able to be determined from accurate design drawings.
2. Treat the forms with oil or grease to make it easier to remove the slab after the concrete has set.
3. Mix concrete with correct ratios of cement, sand, gravel, and water (see “Basics of Mixing Cement”).
A common ratio is 1:2:3 and enough water to make a fairly stiff mix. Remove hard lumps from concrete before mixing.
Sand should be clean and sized 6mm or less. Gravel should be clean and sized 6-25mm. Water should be clear.
4. Pour concrete in the form to a depth of about 50mm and smooth the surface with a trowel (see Figure 11).
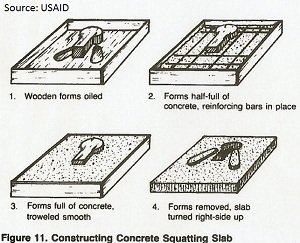
5. Set reinforcing materials (re-bar or wire mesh) in place. Be sure the reinforcing material is positioned correctly and does not touch the sides of the wooden form or block any part of the squatting hole.
6. Pour in the remaining depth of concrete (about 25mm) and smooth the surface with a trowel.
7. Cover concrete with wet straw or burlap bags. Keep shaded for one or two days until concrete takes its initial set.
8. Remove the wooden block used to make the squatting hole. Keep concrete covered and wet for four to six days until it has firmly set. During this time, work can begin on the pit and pit lining and base.
9. After the concrete has set firmly, remove the slab from the wood form. Set it in place over the pit.
10. Build a cover for the squatting hole and set it in place.
Construction Steps For a Wood or Bamboo Squatting Slab For and Outdoor Privy
1. Build a gridwork of notched poles or stout bamboo as shown in Figure 12. The space for the squatting hole is 50mm longer and 50mm wider than the finished hole. Nail or tie the poles together.
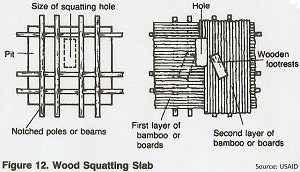
2. Place poles, bamboos or boards across gridwork as shown in Figure 12. Poles or boards overlap space for squatting hole so that actual hole is 400mm long and 150mm wide.
Fasten together ends of poles, bamboo, or boards with binding or nails.
3. Place second layer of poles, bamboo, or boards across the first as shown in Figure 12. Secure each pole or board to the first layer with binding or nails.
4. Cut wood blocks or boards for footrests and nail them in place.
5. Set the completed slab in place over the pit.
6. Build a wooden lid to cover the squatting hole and set it in place.
Constructing a Concrete Sitting Slab with a Brick and Mortar PedestalFor an Outdoor Privy
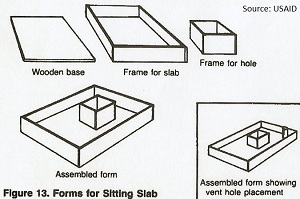
1. Build wooden forms similar to Figure 13. For a ventilated privy, see Figure 13.
Note that the hole for defecation is produced by a square wood frame. Do not pour concrete inside this frame.
2. Follow steps 2 through 9 for a reinforced concrete squatting slab. See Figure 14.
3. Mix concrete mortar with one part cement, three parts sand. and enough water to make a workable mix.
4. Lay bricks or selected stones around the hole in the slab as shown in Figure 14. Mortar the bricks to the slab and mortar them together.
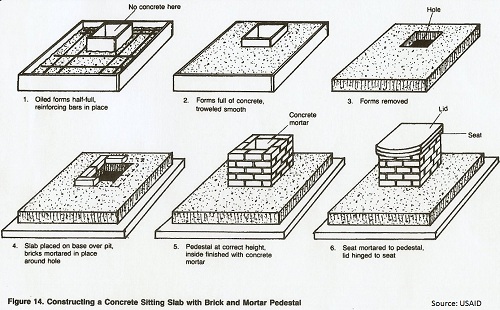
5. Overlap the second row of bricks as shown in Figure 14. Continue laying bricks until the pedestal reaches 275-350mm.
6. Wet the inside of the brick pedestal and plaster the inside with a 12mm thick layer of cement mortar.Smooth the mortar coating with a trowel.
7. Build a wood seat and lid similar to Figure 14 and set in place. Mortar seat to pedestal.
Constructing a Wood Sitting Slab with a Wood Pedestal For an Outdoor Privy
1. Cut two stout poles or beams the length or the pit plus 150-200mm. The beams should be 100mm by 100mm in size. Lay the beams on the base on each side of the pit as shown in Figure 15.
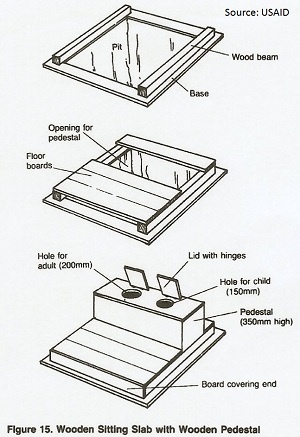
2. Nail 25mm thick boards to the beams as shown in Figure 15. The open space toward the rear of the slab should be about 450mm wide.
3. Build a bench 350-400mm high from 25mm thick boards. See Figure 15. The bench may have one or two holes for defecation.
If two holes, make one 200-250mm diameter for adults and one about 150mm diameter for children. The edges or the holes should be sanded and free from splinters.
4. Build a hinged lid for each hole and attach in place.
5. Nail a board to each end of the latrine floor to seal the pit. See Figure 15.
Construction Steps For Making a Vent Pipe For an Outdoor Privy
1. Cut a rectangular sheet of tin to the dimensions provided by the project designer. See Figure 16.
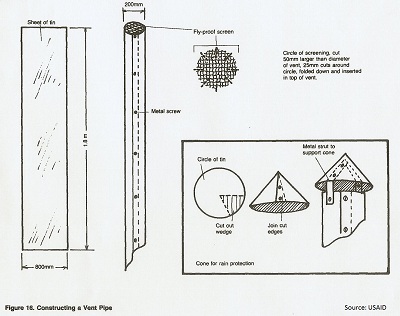
2. Bend the tin to form the vent pipe. Overlap the edges about 25mm and fasten with metal screws. See figure 16.
3. Cover one end of the pipe with fly-proof screen. See Figure 16.
4. A cone-shaped vent cover which is optional, but recommended in rainy regions, may be made from a round piece of tin about 250mm in diameter.
Cut out a wedge with a base of about 150mm. bend tin to form a cone, and fasten with metal screws (see Figure 16). Attach the cone to the end of the vent pipe with metal struts to leave free air space.
5. The vent pipe should not be installed until after the latrine shelter is in place. Place the open end of the vent pipe in the hole in the slab and make the edges air-tight with mortar or tar.
Secure the vent pipe to the outdoor privy structure. The screened end of the pipe should be 0.3-0.6m above the roof of the privy.
Construction Steps For a Pour-Flush Bowl For an Outdoor Privy
1. Pour-flush bowls are often pre-fabricated units made from galvanized metal, concrete, molded rubber, or ceramic material.
They are built to fairly exact specifications and may be difficult to produce in the field.
A skilled craftsman could possibly build a concrete bowl using Figure 6a or, a galvanized metal pour-flush bowl using the design information in Figure 6b.
This website does not describe how to build a pour-flush unit, but if you try it keep the following two points in mind: the edges of a galvanized metal bowl should be rounded or dulled by a file; and a concrete bowl is generally cast in two halves in wooden molds, the halves mortared together and the entire unit cured under water for a week.
2. Secure the pour-flush bowl to the slab with cement mortar and allow two or three days to set before use.
Construction Steps For a Chute For an Off-Set Pit-Type Outdoor Privy
1. Cut a rectangular sheet of tin or galvanized metal to the dimensions provided by the project designer. See Figure 17.
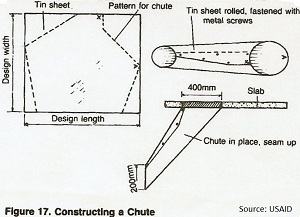
2. Bend the sheet of tin to form the chute. Overlap the edges so that the overlapping seam is along the top edge and fasten with metal screws. Cut the sheet or tin in a shape like that shown in Figure 17 prior to bending.
3. Mortar the upper end or the chute in place below the squatting slab or seat, circling the squatting hole or the hole in the seat. See Figure 17.
Constructing a Wood Platform For an Off-Set Pit-Type Outdoor Privy
1. Build a framework to the dimensions of the slab, or slightly smaller, using poles or beams at least 50mm in diameter. See Figure 18a.
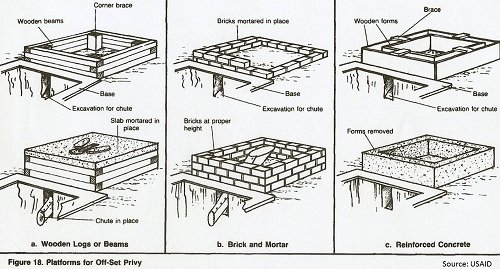
2. Add one or more rows of poles or beams to the framework, nailing or binding each row to the one below, until the correct height is reached.
When the slab is in place, its top should be about 200mm above ground level. For example, if the slab is 75mm thick, the framework should be 125mm high: 75mm + 125mm = 200mm.
3. When the platform reaches the correct height, nail or tie corner pieces inside each corner to further secure it. See Figure 18a.
4. When the platform is completed, place the slab on top. See Figure 18a.
Constructing a Brick and Mortar Platform For an Off-Set Pit-Type Outdoor Privy
1. Lay a row of bricks mortared together, to the dimensions of the slab at the desired slab location. See Figure l8b.
2. Continue mortaring rows of bricks in place until the correct height is reached as described in step 2 for wood platform. See figure 18b.
3. After the mortar has set for two or three days, mortar the slab on top of the platform. See Figure 18b.
Constructing Slab Construction For an Off-Set Pit-Type Outdoor Privy
1. Build wooden forms for the concrete platform to the correct height as described in step 2 for wood platform and to the dimensions of the slab.
Build the forms in place so that the finished platform will have walls at least 75mm thick. See Figure 18c.
2. Mix concrete using the correct proportions of cement, sand, gravel and water as described in step 3 for a reinforced concrete squatting slab.
3. Pour concrete in the forms to about half their depth.
4. Lay reinforcing material in place.
5. Pour in the remaining depth of concrete and smooth the surface both a trowel.
6. Cover concrete with wet straw or burlap bags and allow it to set for three to seven days. Then, remove wood forms. See Figure l8c.
7. Mortar the slab on top of the platform.
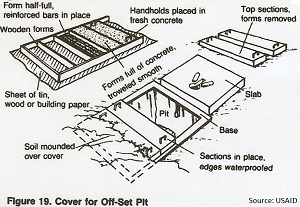
Constructing of a Reinforced Concrete Cover For an Off-Set Pit-Type Outdoor Privy
1. Build wooden forms for the cover. See Figure 19. The cover is made in sections with each section about 75mm thick.
The length of each section equals the width of the pit plus 150-200mm so that the sections overlap the pit on each side by 75-100mm.
All sections but one are 300mm wide. One section is 300mm wide plus whatever measurement is necessary to add up to the total length or the pit plus 150mm.
The width of this last section should be provided by the project designer or calculated in the field. For example, if the pit is 1500mm long, then the total widths or the sections should equal:
1500mm plus 150mm or 1650mm. The widths of the sections would be:
300mm + 300mm + 300mm + 300mm + 450mm = 1650mm
2. Mix concrete using the correct proportions of cement, sand, gravel and water as described in step 3 for a reinforced concrete squatting slab.
3. Pour concrete in the forms to about half their depth.
4. Lay reinforcing material in place.
5. Pour in the remaining depth of concrete and smooth the surface with a trowel.
6. Set handholds into the concrete near both ends of each section. See Figure 19.
7. Cover the concrete with wet straw or burlap bags and keep moist for five to seven days to allow concrete to set.
8. Remove wooden forms and place sections over the pit. Do not mortar.
Waterproof between each section, and between the sections and the base around the pit with tar or other material. See Figure 19.
9. Mound with soil. See Figure 19.
Return to "Intro. to Sanitation Facilities, Part 2" from "Outdoor Privy"