Composting Toilet Operation and Maintenance is Easy to Accomplish and Requires No Special Skills or Tools
Composting toilet operation involves keeping the shelter and interior clean and periodically opening and closing vaults and removing compost for use in field crops or gardens. Maintaining a compost toilet requires monthly inspection and repair of any damage that may occur.
Note: The content on this page has been adapted from publications of USAID entitled “Water for the World”.
Correct use of the composting toilet is necessary in order to prevent severe problems such as fly breeding and foul odors, and to maintain the beneficial bacterial action that produces compost.
Materials Needed Operation and Maintenance
For operating and cleaning a composting toilet:
(1) a lid to cover defecation holes;
(2) cleansing material like toilet paper, leaves, etc.;
(3) a box or jar for ashes and straw;
(4) a can or container for sprinkling ashes into the vault;
(5) a brush or broom for cleaning.
For changing vaults and removing the compost:
(1) tar or other material for sealing openings of the closed vault;
(2) a shovel;
(3) a hoe;
(4) a wheelbarrow.
For repairing toilet and shelter:
Use the same materials used for construction of the toilet, like cement, sand, gravel, mixing containers, trowel, boards, bamboo, wire, hammer, saw, nails, and fly-proof screen.
Preparing a Compost Toilet for Use
Only one vault of the composting toilet will be used at a time, so be certain the squatting hole of the vault not in use is covered with a heavy lid.
Prepare the vault to be used by putting in a loose layer of leaves, weeds, straw, grass clippings, or sawdust. This will soak up liquids.
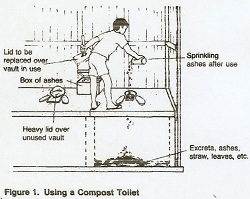
Place a lid with a handle over the squatting hole. Put a box or jar of ashes or powdered soil in the shelter along with an empty can or container.
Also stock the shelter with a supply of cleansing material like toilet paper or leaves. See Figure 1. The composting toilet is now ready for use.

Using a Composting Toilet
Each time, after the toilet is used, use the can or container in the shelter to sprinkle ashes or fine earth into the vault, on top of the new waste.
This will soak up liquid and help prevent odors and fly breeding. Always replace the lid over the squatting hole. See Figure 1.
At the end of each day, throw kitchen scraps and house and yard sweepings into the vault. Once or twice a week put in grass clippings, straw, leaves, or sawdust to cover up the contents of the vault.
Do not worry about over-filling the vault, because bacterial action will greatly reduce the volume of the contents.
It might be necessary to prepare some kind of leaflet or sign showing pictures of how to use the composting toilet. This will help people who cannot read to understand and remember how to use the toilet.
Clean the toilet at least once each week by sprinkling ashes or powdered soil on the slab and around the squatting hole and sweeping them into the vault. Replenish the supply of ashes or fine soil in the box.
Caution!
Do not use the toilet for a washroom and do not pour water into the vault. If you do this, the contents of the vault will become a soggy, smelly mess!
Do not put non-biodegradable material such as wood, glass, metal, or discarded clothing in the toilet. This material will just sit there and not break down readily into compost. Always wear gloves when handling compost.
Changing Vaults
Over time, the vault will gradually fill with excreta and other material. When the contents reach 0.2-0.3 meters (8-10 inches) below the squatting slabs, probably after 6-12 months of use, it is time to change vaults.
Fill the used vault with fine soil. Remove the heavy lid from the empty vault and place it over the squatting hole of the full vault. As it sits, its contents will undergo the composting process over time as the empty vault is being filled.
Prepare the empty vault by putting in a layer of leaves, weeds, straw, grass clippings, sawdust, or similar material. This vault is now ready for use as described above ("Using a Compost Toilet").
After 6-12 months of use, it will then be time to seal this second vault and reopen the first one again.
Removing Compost
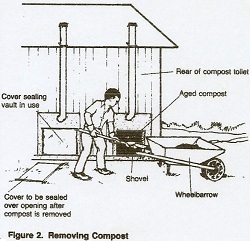
Once the contents of a vault have been sealed for 6-12 months, they will turn to compost. Remove the cover from the rear wall opening of the full and completely composted vault.
Use a hoe or rake and shovel to remove compost from the vault and load it in a wheelbarrow or cart. See Figure 2.

Leave a shallow layer of compost in the vault to prepare it for use now that it is empty. Reseal the cover over the rear wall opening.
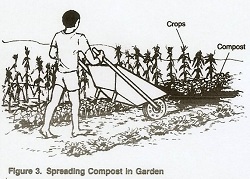
Cart the compost to a garden or field of crops, shovel it on the ground, and work it into the soil. See Figure 3.
Maintaining a Composting Toilet
A properly constructed and operated composting toilet will require little or no maintenance.

However, you should inspect it once each month for possible damage due to weather or other causes. Inspect the rear wall covers to be certain they are tightly sealed.
If necessary, reseal them with tar or other material. Inspect the base for cracks and repair with concrete mortar.
Inspect the privy shelter and vent pipes. Repair or replace damaged parts.
Maintain the grounds around the composting toilets and keep surface water from flowing near it.
Keep a maintenance record containing the dates and descriptions of the maintenance and repair actions taken.
With proper operation and maintenance, a composting toilet can produce beneficial compost that can be used as a crop fertilizer and an organic matter soil supplement.
Human waste undergoes bacterial decay. It does not accumulate and it does not require burying or disposal like it does in a conventional pit latrine.
Return to Compost Toilet Design and Construction from "Composting Toilet"
Return "Home"


